
Loomis-Wood Options window
The size of Loomis-Wood windows can be modified in the common way of resizing windows. Resizing is done for all open LW windows simultaneously. The size and positions of the LW windows are written to the project file, so that they are opened in the form as they were closed. If the display area of the LW diagram is larger than the actual size of the LW window, the standard vertical and/or horizontal scroll bars appear automatically.
The appearance of the display area of the Loomis-Wood windows can be modified by changing several parameters in the Loomis-Wood Options window, which is opened by the command Loomis-Wood options from the Loomis-Wood menu.
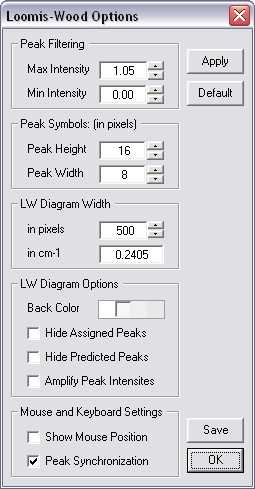
The Peak filtering function allows hiding peaks with absorption intensities lower than the chosen minimum and higher than the chosen maximum peak intensities. For bringing these changes into effect, the user has to click the Apply button. The peak filtering function can be used for simplifying the diagram in the case of congested spectrum.
The size of triangle peak symbols in the LW diagram is changed by editing the Peak height/width values. The physical width of the displayed lines of the LW diagrams is controlled by the value of the Horizontal size (in pixels).
The width of the Loomis-Wood diagram on the program desktop is controlled by the value of width in pixels. If the LW diagram is wider than the physical width of the LW window(s), the LW windows appear with a horizontal scroll bar. Adjusting of the physical width of the Loomis-Wood window(s) to the width of the displayed LW diagram is done simply by dragging one of the vertical borders of any of the open LW windows to the desired width. The change of LW window width is done automatically in all open LW windows.
The logical width of the LW diagram is controlled by the value of LW diagram width in cm-1. This defines the width of the spectrum section, which is placed within the currently set horizontal size of the window. One special feature of this setting should be mentioned. If its value is set to zero, then the displayed lines in the LW diagram have width slightly larger than 2B.
The remaining two Mouse and keyboard settings do not need clicking the Apply button and come into effect by clicking their corresponding checkboxes. When the Show mouse position function is enabled, the value in the Wavenumber box in the information bar of the active LW window is updated with every mouse move in the display area of the LW window. When this function is disabled, the value in the Wavenumber box is updated with every pressing of the Left/Right/Up/Down arrow on the keyboard.
With the Peak synchronization function enabled, the cursor position in the active LW window is synchronized with the other open LW windows so that LSCD checking can be performed efficiently. With every move of the cursor in the active LW window, which results in the change of the Error value, the peaks with the nearest Error values are found in each of the related LW windows, the cursor (black rectangle) is placed on them and the corresponding Errors are displayed in the information bars of these related windows. The active/related status of the LW windows is toggled by pressing 1/2/3 as described in the section LW window (display functions).